MyBatisのInterceptorで削除データロガーを実装する
2025/06/19

こんにちは、iOS エンジニアの伊藤です。
前編の続きです。 今回は Bluetooth®︎ LE 接続のところから書いていきます!
前編からも、チラチラと出ていた EnvironmentObject についてお話ししておこうかと思います。
・@Published で宣言している変数はリアルタイムに変更か検知される。
・その都度 View から値を渡さなくても、他の View にもリアルタイムで表示を変更することができる。
・記述が本当に簡単
この機能があることによって 全体のコード量がググッと減ります。 Delegate 地獄もなくなります。
更に変数の監視もできることから、 Bluetooth®︎ LE を扱うことに対してかなり有効活用できるので、今回はたっぷり活用しています。
Xcode 12.4 (12D4e)
macOS Catalina 10.15.7
今回の実装では、 Bluetooth®︎ LE 関係は CoreBluetoothViewModel クラス一つで受け持っています。
@Published var isBluetoothPower: Bool = false
@Published var isSearching: Bool = false
@Published var isConnected: Bool = false

@Published var foundPeripherals: [Peripheral] = []
@Published var foundServices: [Service] = []
@Published var foundCharacteristics: [Characteristic] = []
View の画面を更新するための値として、 @Published でいくつかの変数を保持しています。
この宣言をしておくだけでこのクラス内で呼ばれた Delegate 関数の中で、@Published の変数の値を更新すれば、それだけで View がリロードされます。
isSearching と isConnected では View の移動とアニメーションを管理しています。
//  CoreBluetoothViewModel.swift
func startScan() {
  let scanOption = [CBCentralManagerScanOptionAllowDuplicatesKey: true]
  centralManager?.scanForPeripherals(withServices: nil, options: scanOption)
  print("# Start Scan")
  isSearching = true
}

//  ContentView.swift
if bluetoothManager.isSearching {
  Color.gray.opacity(0.6)
  .edgesIgnoringSafeArea(.all)
   ~~  略  ~~
}
StartScan() を呼び出した時に、 isSearching が true になります。
スキャンをはじめて Peripheral が見つかるまで、画面を覆うモーダルが表示されます。
//  CoreBluetoothViewModel.swift
func didConnect(_ central: CBCentralManagerProtocol, peripheral: CBPeripheralProtocol) {
  guard let connectedPeripheral = connectedPeripheral else { return }
  isConnected = true
  connectedPeripheral.peripheral.delegate = self
  connectedPeripheral.peripheral.discoverServices(nil)
}

//  ScanListView.swift
NavigationLink("", destination: ScanDetailView(isRootViewActive: $bluetoothManager.isConnected),
                        isActive: $bluetoothManager.isConnected)
Bluetooth®︎ LE デバイスと接続すると、 isConnect が true になります。
そして NavigationLink が発動し、接続後のデータを表示する View へ移動します。
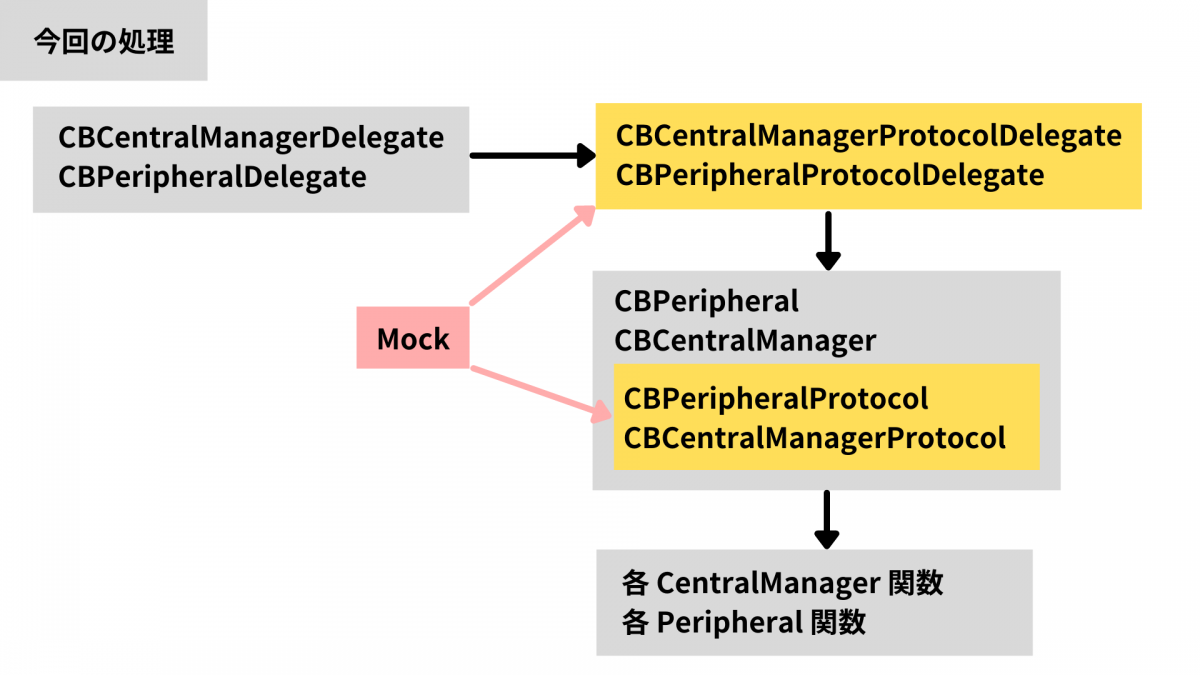
Bluetooth®︎ LE のアプリでは、どうしてもデバイスありきの動作確認が多くなってしまいますが、そんな問題を解決した Mock も今回のサンプルに組み込んであります。
CBPeripheraDelegate と CBCentralManagerDelegate から自作 Protocol を通して、各関数が呼ばれるようにしています。
override init() {
  super.init()
  #if targetEnvironment(simulator)
  centralManager = CBCentralManagerMock(delegate: self, queue: nil)
  #else
  centralManager = CBCentralManager(delegate: self, queue: nil, options: [CBCentralManagerOptionShowPowerAlertKey: true])
  #endif
}
シュミレータでアプリを起動した時は Mock が起動されるようになっています。
そしてMock から、適時 CBCentralManagerMock, CBPeripheralMock を経由して、 CoreBluetooth の関数を呼び出すことができます。
今回は Characteristic リストから取得した値は Read した値だけが表示されるようにしていますが、
他にも同様に Write や Notify も Mock から扱うことができるようになっているので iOS 側のみで開発を進めることができるようになっています。
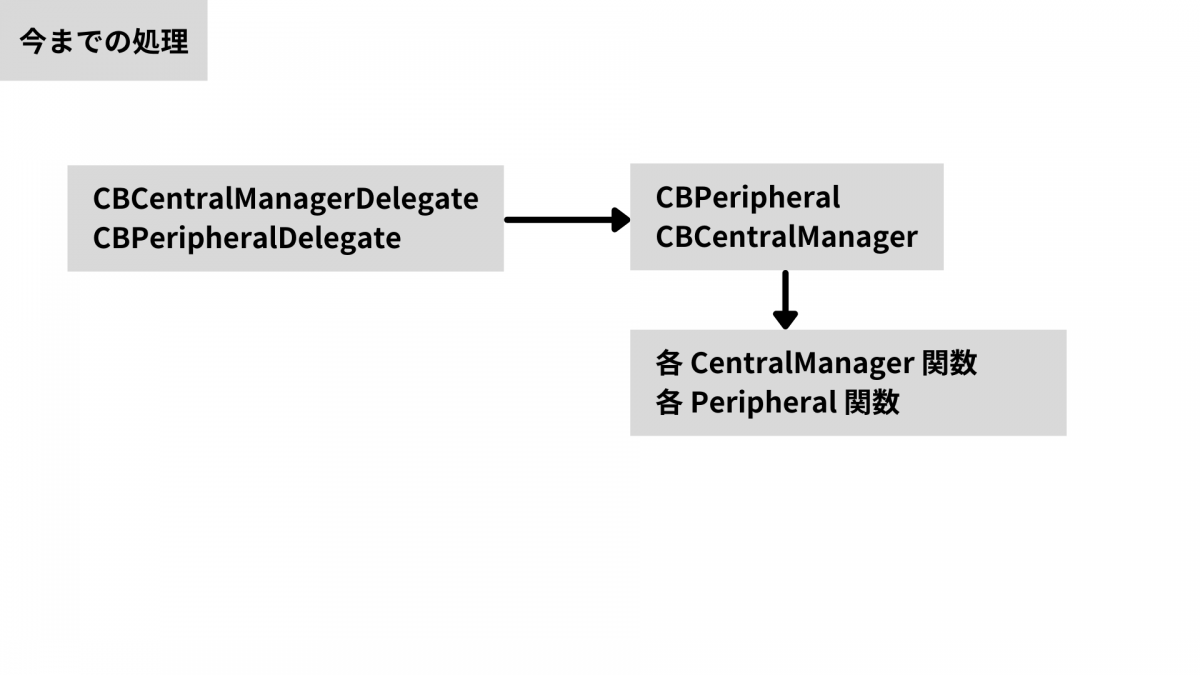
CentralManager の処理に関しては、今までの ViewController × CoreBluetooth と変わりはありません。
if let index = foundPeripherals.firstIndex(where: { $0.peripheral.identifier.uuidString == peripheral.identifier.uuidString }) {
  if foundPeripherals[index].discoverCount % 50 == 0 {
    foundPeripherals[index].name = _name
    foundPeripherals[index].rssi = rssi.intValue
    foundPeripherals[index].discoverCount += 1
  } else {
    foundPeripherals[index].discoverCount += 1
  }
} else {
  foundPeripherals.append(foundPeripheral)
  DispatchQueue.main.async { self.isSearching = false }
}
Peripheral が見つかると呼ばれる Discover 内のコードです。
この関数内で発見した Peripheral は foundPeripheral に追加され、その都度 View に表示されるようになっています。
見つかる度に Viewに更新が入ると処理が重たくなるので、発見した回数によって更新を制限しています。
CBPeripheral の処理についても、今までの ViewController × CoreBluetooth と変わりはありませんが、
見つかるたびに TableViewCell にセットして、 reloadData を呼ぶ作業はなくなってます。
セルの数なども View 側で求めてくれるので ViewModel では値を常に最新に保つことだけを考えれば良い形になっています。
// CoreBluetoothViewModel.swift
func didDiscoverServices(_ peripheral: CBPeripheralProtocol, error: Error?) {
      peripheral.services?.forEach { service in
          let setService = Service(_uuid: service.uuid, _service: service)

          foundServices.append(setService)
          peripheral.discoverCharacteristics(nil, for: service)
      }
}

func didDiscoverCharacteristics(_ peripheral: CBPeripheralProtocol, service: CBService, error: Error?) {
     service.characteristics?.forEach { characteristic in
           let setCharacteristic: Characteristic = Characteristic(_characteristic: characteristic,
                                                                            _description: "",
                                                                            _uuid: characteristic.uuid,
                                                                            _readValue: "",
                                                                            _service: characteristic.service)
            foundCharacteristics.append(setCharacteristic)
            peripheral.readValue(for: characteristic)
      }
}

func didUpdateValue(_ peripheral: CBPeripheralProtocol, characteristic: CBCharacteristic, error: Error?) {
     guard let characteristicValue = characteristic.value else { return }

     if let index = foundCharacteristics.firstIndex(where: { $0.uuid.uuidString == characteristic.uuid.uuidString }) {

          foundCharacteristics[index].readValue = characteristicValue.map({ String(format:"%02x", $0) }).joined()
     }
}
適時 didDiscoverCharacteristics や didUpdateValue で処理をすれば、 Bluetooth®︎ LE でやりたいことは大体出来るかと思います。
【SwiftUI × CoreBluetooth】 について前後編で書かせてもらいましたが、いかがでしたでしょうか。
昔 Objective-C や Swift で Bluetooth®︎ LE を挫折してしまった方も SwiftUI を期に Bluetooth®︎ LE 開発をしてみたいなと思っていただけると嬉しいです。
iOS 14.0 になってからも続々と新しい機能が追加される SwiftUI なので、常に最新情報をチェックして記事にしていければと考えています。